Showing posts with label windows7. Show all posts

Monday, 27 January 2014

The Best Guide to Hack Windows 7 Password


  • First, you will start up the computer (or restart it).
    Win-7-Password-Hack-02
  • While the computer is coming up and you can see it saying, “Starting Windows,” grab and hold down the power buttonuntil it does a hard-shutdown.
    Win-7-Password-Hack-03
  • This will make Windows have an issue. It will think it is broken and ask you if you want to Launch Repair, or Start Normally. You will choose to Launch Startup Repair.
    Win-7-Password-Hack-04
  • Startup repair will boot up and take a little while, then it will ask you if you want to use a System Restore Point. You are going to choose “Cancel.”
    Win-7-Password-Hack-05
  • Now is the long part… You will wait, and wait. After a long time, you will get a dialogue telling you that Startup Repair could not repair the computer automatically! What! After all that waiting? That is okay, because this plays right into our plans. So, you will click on the down arrow in the bottom left so you can see the Problem Details.
    Win-7-Password-Hack-06
  • Now you will click on the link at the very end of the Detail Report. It is the link for the Privacy Statement.
    Win-7-Password-Hack-07
  • Notepad will come up with the Privacy statement in it. You will go on the File menu and go to Open.
    Win-7-Password-Hack-08
  • Using the Open Dialogue, you will go to “Computer” –> “Local Disk” –> “Windows” –> “System 32
    Win-7-Password-Hack-09
  • Now, don’t forget to switch from “Text Documents” to “All Files” so you can see every file in this folder.
    Win-7-Password-Hack-10
  • Find the application file “sethc” This is the accessibility keys program.
    Win-7-Password-Hack-11
  • Rename this file as a backup file: I named it “sethc-bak
    Win-7-Password-Hack-12
  • Now find the file: “cmd” in the same folder. This is your command prompt. Right click on this one and go to Copy. Then right click in the white background of the folder and Paste.
    Win-7-Password-Hack-13
  • You will now have a file called “cmd – Copy.” You need to rename this to “sethc”. Then close out of all the windows and finish, so that the computer restarts.
    Win-7-Password-Hack-14
  • You will now be at the Login prompt (where you don’t know the password). Hit the Shift Key on your keyboard 5 times.

  • The Command Prompt with Administrator Privileges comes up!
    Win-7-Password-Hack-16
  • You will type in:
    net user
    and then make note if your intended victim username. If the username you have at the login screen is not here, then it is probably a mask for one of the ones here on the net user screen. Choose wisely.
    Win-7-Password-Hack-17
  • You can find out which user is in the admin group by simply typing:
    net user [username]
    for each one.
    Win-7-Password-Hack-18
  • To reset the password, type in:
    net user [username] *
    Win-7-Password-Hack-19This will give you a prompt to type a new password. Keep in mind that if you set it to something new, the user will definitely not be able to get into their computer. However, if you just leave it blank, they will not be prompted for login. It is much more likely this way, that they will think it is some fluke. Maybe you put something on to monitor them, and now they will just set their password again and go on about their business. Whereas, if they can’t get in because you changed the password, they will probably wipe the drive.
  • Cheers
  • Tutorial to install OSX Mavericks on PC

    Want to install Mac OS X Mavericks Hackintosh on your PC? Thanks to the latest UniBeast release which adds support for Mavericks, you can now have best of both worlds (Windows and Mac) on your Intel-based PC.
    The following guide will help you install OS X Mavericks v10.9 on your PC.
    mavericks hackintosh
    Requirements:
    • Access to Mac for downloading OS X Mavericks from MAS and creating UniBeast drive.
    • 8GB+ USB flash drive.
    • An Intel based PC capable of running Mavericks.
    Guide on how to install OS X Mavericks Hackintosh on your PC:
    Step 1: On your Mac, download OS X Mavericks for free from the Mac App Store. Make sure the downloaded installation file is in /Applications folder.
    hero
    Step 2: Download the latest version of UniBeast and MultiBeast from here.
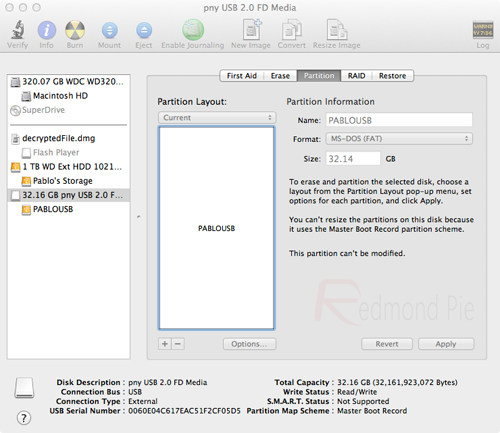
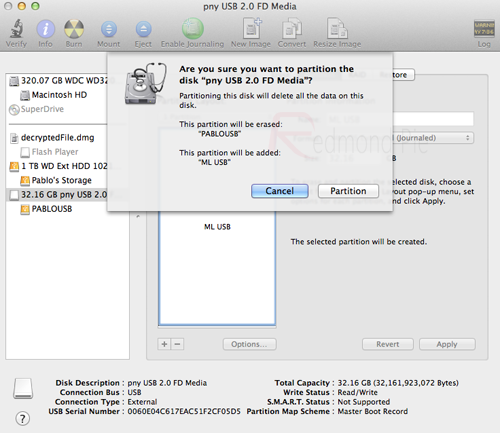
    Step 3: Format your USB flash drive using Disk Utility on Mac with the following settings:
    • Start Disk Utility on Mac. Select your USB drive from the left hand column.
    UniStep3
    • Select the Partition tab from the right side. Click on Current dropdown menu and choose1 Partition.
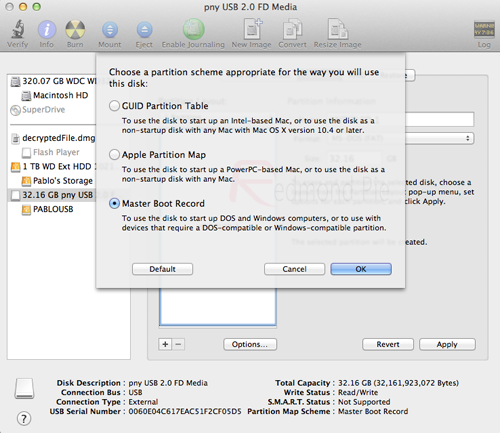
    • Now click on Options… button, select Master Boot Record.
    UniStep5
    • Type ‘USB’ as the Name for the drive. Select Mac OS Extended (Journaled) as Formattype.
    UniStep6
    • Once done, click on Apply followed by Partition.
    Step 4: Now start UniBeast that you downloaded in Step 2 above.
    Step 5: Skip through the first few screens by clicking Continue or Agree, until you get toDestination Select screen.
    Mavericks Hackintosh 3
    Step 6: Select your USB drive and click Continue to proceed.
    Step 7: On Installation Type screen, make sure Mac App Store Mavericks – 10.9 is selected in packages. Additionally, select Legacy USB Support if you are using an old system with Socket 1156. Select Laptop Support package if you are installing it on a notebook PC. Once done, clickContinue, enter admin password for your Mac if prompted, and let UniBeast make a bootable Mavericks hackintosh USB flash drive for your PC.
    Mavericks Hackintosh2
    Once done, move MultiBeast file that you downloaded in Step 2 above to this bootable Mavericks hackintosh USB drive (you will need this later).
    Step 8: Now insert this bootable Mavericks hackintosh drive in your PC. Make sure the BIOS is set to boot the system from USB devices. When you boot from the USB drive, you will see Chimera boot screen, select “USB” and hit Enter on keyboard to continue.
    Step 9: Once you are into OS X installer, you need to format the HDD you want to install Mavericks to using Disk Utility with the following settings:
    • On the menu bar, click on Utilities, then start Disk Utility.
    • Select the HDD you want to install OS X to from left hand side.
    • From right side, click on Partition tab, then click on Current dropdown menu and choose 1 Partition.
    • Now click on Options… button, choose GUID Partition Method.
    • Type ‘Macintosh HD’ as the Name for HDD. Select Mac OS Extended (Journaled) asFormat type.
    • Click on Apply followed by Partition to partition the drive.
    Step 10: Once done, close the Disk Utility program, go back to the installer. Select “Macintosh HD” as the drive you want to install OS X to.
    photo-21
    Click on Install for the installation to begin.
    photo (3)
    You’re almost there! Once the OS X installation is complete, you need to make this HDD bootable. This can be done using MultiBeast utility. MultiBeast can not only make OS X HDD bootable, but can also install the required drivers for audio, WiFi, graphics, LAN and more.
    Step 11: Reboot your system again using the bootable Mavericks hacktintosh flash drive. From the Chimera boot screen, select “Macintosh HD” this time.
    Step 12: Start MultiBeast, from here, choose all the drivers required for your PC. Once done, click on Build followed by Install to complete the installation.
    Mavericks Hackintosh 1
    Mavericks Hackintosh (1)
    That’s it! You now have fully working OS X Mavericks installed on your PC.
    Mavericks Hackintosh

    Wednesday, 22 January 2014

    How to Lock Folder in windows 7 without using any 3rd party software

    This tutorial will guide you through the steps required to create a locked folder in Windows 7 – without installing any additional 3rd party software.While the steps below will guide you in creating a hidden and password protected folder, this method is not 100% secure. It will deter the average computer user enough, but an advanced user will be able to access the contents of this folder. 
    1. Create a new folder and name it whatever you would like.
    1. Open the folder, right-click on a blank area in it, then select New -> Text Document from the pop-up menu.
    1. Open the text file you just created by double-clicking it and copy/paste in the following text:
    cls@ECHO OFFtitle Folder Privateif EXIST "Control Panel.{21EC2020-3AEA-1069-A2DD-08002B30309D}" goto UNLOCKif NOT EXIST Private goto MDLOCKER:CONFIRMecho Are you sure you want to lock the folder(Y/N)set/p "cho=>"if %cho%==Y goto LOCKif %cho%==y goto LOCKif %cho%==n goto ENDif %cho%==N goto ENDecho Invalid choice.goto CONFIRM:LOCKren Private "Control Panel.{21EC2020-3AEA-1069-A2DD-08002B30309D}"attrib +h +s "Control Panel.{21EC2020-3AEA-1069-A2DD-08002B30309D}"echo Folder lockedgoto End:UNLOCKecho Enter password to unlock folderset/p "pass=>"if NOT %pass%== PASSWORD_GOES_HERE goto FAILattrib -h -s "Control Panel.{21EC2020-3AEA-1069-A2DD-08002B30309D}"ren "Control Panel.{21EC2020-3AEA-1069-A2DD-08002B30309D}" Privateecho Folder Unlocked successfullygoto End:FAILecho Invalid passwordgoto end:MDLOCKERmd Privateecho Private created successfullygoto End:End
    1. In the above code, replace the key PASSWORD_GOES_HERE with the password you want to use to unlock the folder. For example if you want the password to be 123456, the line should look like:
    if NOT %pass%== 123456 goto FAIL
    1. Save your new file in the .bat format with the complete file name being locker.bat. To do this, make sure to change the Save as type: to All Files (*.*).

    click to enlarge
    1. In the folder you created back in Step #1, double click the locker.bat file and there will now be a new folder named Private where you can put anything you want.
    1. Upon exiting, double click the locker.bat file again. It will prompt you to answer whether you want to lock your folder or not. Press Y and the private folder will disappear.

    click to enlarge
    1. In order to retrieve the Private folder, all you have to do is double click the locker.bat file and enter the password which you set in Step #4 and the folder will appear again for you to access.

    click to enlarge
    1. That’s it!